




Website Migration Checklist: How to Move Your Site Without Losing SEO Rankings
- Manqoosh Seo
- July 7, 2026
- Uncategorized
- 0 Comments
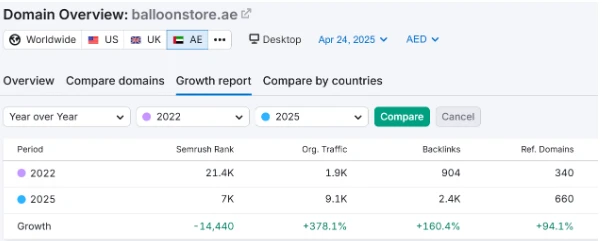
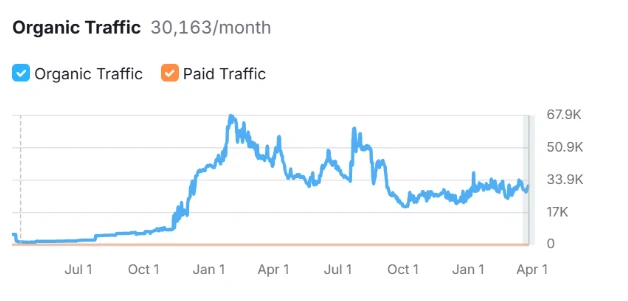
Picture this: the new website launches, the design looks sharper than ever, and three weeks later, organic traffic has been cut in half. It happens more often than most businesses expect, and almost always for completely preventable reasons.
A website migration is one of the riskiest projects a business can take on from an SEO standpoint. You could be switching domains, moving to a new CMS, redesigning your entire site, or simply shifting from HTTP to HTTPS. Whatever the reason, the moment your URLs, structure, or content change, Google has to re-crawl and re-evaluate your entire site from scratch.
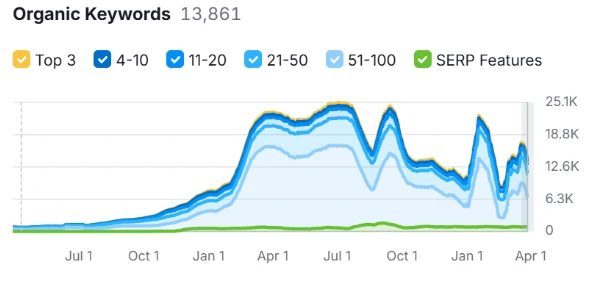
That is exactly where most businesses lose rankings. Not because migration itself is bad for SEO, but because it is handled without a plan. Missing redirects, broken internal links, and forgotten meta tags can quietly wipe out years of ranking progress within days of going live. It is not unusual to see organic traffic drop by 30, 50, or even 70 percent after a poorly planned migration, and recovering from that kind of drop takes far longer than the migration itself, often months of rebuilding trust with search engines and repairing the technical issues one by one.
The businesses that come through a migration unscathed are almost always the ones that treated SEO as part of the project plan from day one, not as an afterthought once the new site was already built. Manqoosh Marketing helps you with a website migration checklist so you can move, redesign, or rebuild your site while keeping your search visibility intact.
What Counts as a Website Migration
Any change that affects how search engines crawl, index, or understand your site counts as a migration.
The most common types include:
- Domain migration, moving from one domain name to another
- CMS or platform migration, such as moving from WordPress to Shopify or a custom build
- HTTPS migration, switching from HTTP to a secure protocol
- Site structure migration, changing your URL patterns or folder hierarchy
- Design migration, a full visual and UX redesign without changing the domain
- Content migration, consolidating, merging, or removing pages
- Server or hosting migration, changing your hosting provider, or infrastructure
- Mobile migration, moving from separate mobile URLs to a responsive design
Each type carries its own risks, but they all share the same core principle. Every existing URL that has ranking value, backlinks, or organic traffic needs a clear path forward.
Why Rankings Drop During a Migration
Search engines rank URLs, not just domains or brands. When a URL changes without a proper 301 redirect, Google treats the old page as gone and the new page as brand new, with zero ranking history behind it.
Add in broken internal links, duplicate content from staging environments getting indexed, or a robots.txt file accidentally blocking the entire new site, and even a well-designed website can see organic traffic drop by 50 percent or more within weeks. The good news is that almost every one of these issues is preventable. SEO loss during migration is rarely caused by the migration itself. It is caused by skipping steps.
Complete Pre-Migration SEO Checklist
The work you do before launch determines whether your rankings survive. Rushing this stage is the single biggest reason migrations go wrong. Most businesses treat migration as a design and development project first and an SEO project second, if at all, and by the time someone thinks to loop in SEO, the new site is already built with a different URL structure and no plan for redirects.
Working through the steps below before a single line of code changes gives you a documented baseline to measure against, a redirect map ready to deploy, and far fewer surprises once the new site goes live.
1. Audit and Benchmark Your Current Site
Before anything changes, you need a clear record of how your site currently performs so you can measure the impact of the migration later.
- Export your current organic traffic, rankings, and conversion data from Google Analytics and Search Console
- Record your top-performing pages by traffic, keywords, and backlinks
- Run a full crawl of your existing site using a tool like Screaming Frog to capture every live URL
- Document current page load speed and Core Web Vitals scores
- Take screenshots or archive key pages in case you need to reference the original content or layout
2. Build a Complete URL Inventory
You cannot redirect what you have not identified. Pull URLs from your CMS, XML sitemap, Google Search Console index report, and analytics data, then combine them into a single master list. It is common to find old blog posts, campaign landing pages, or category pages that no longer appear in your navigation but still hold rankings and backlinks. Missing even a handful of these pages during a migration is one of the most common causes of traffic loss.
3. Create Your URL Redirect Map
This is the single most important document in the entire migration. It maps every old URL to its new equivalent using 301 redirects, so both users and search engines land on the right page instead of a dead end.
- Map every old URL to the most relevant new URL, not just the homepage
- Keep redirects one-to-one wherever possible, since mass redirects to a single page look manipulative to Google and dilute relevance
- Avoid redirect chains, where URL A redirects to B, which redirects to C. Point everything directly to the final destination
- Use 301 redirects for permanent moves, never 302, since 302s do not pass ranking signals the same way
- Flag pages that genuinely have no equivalent on the new site and let them return a proper 404 or 410 rather than forcing an irrelevant redirect
4. Audit Your Backlink Profile
Pull a full backlink report using a tool like Ahrefs or SEMrush and identify which pages are attracting the most external links. These pages need extra attention in your redirect map, since losing the SEO value of an earned backlink because a URL changed is an unnecessary loss you can avoid entirely with the right redirect in place.
For your highest-value backlinks, it is worth going a step further than a redirect. Reach out to the site owner and ask them to point the link directly to the new URL, since a redirect protects you well but a direct link removes any long-term dependency on that redirect staying in place.
If you maintain a disavow file for toxic or spammy backlinks, remember to reapply it to your new Search Console property after migration as well, since disavow files are tied to the property they were uploaded to and do not carry over automatically when you switch domains or add a new property.
Technical Elements You Must Carry Over
Beyond redirects, several technical SEO elements need to be replicated or improved on the new site. Skipping any of these can cause indexing issues even if your redirects are perfect.
- Title tags and meta descriptions for every page, migrated exactly or improved, never left blank
- Header tag structure (H1, H2, H3) that reflects the same topical hierarchy
- Structured data and schema markup, including organization, breadcrumb, product, or article schema
- Canonical tags pointing to the correct new URLs
- Hreflang tags if your site targets multiple languages or regions
- An updated XML sitemap that reflects only the new, live URLs
- A robots.txt file that allows search engines to crawl the new site, not the outdated rules from staging
- Internal links updated to point to new URLs directly, rather than relying on redirects to catch them
- Image file names and alt text preserved or improved for image search visibility
Staging Environment Best Practices
Build and test the new site on a staging environment before it goes live, and treat that staging site as something search engines should never see. Add a noindex tag and password protection to the staging URL so Google does not accidentally crawl and index duplicate content that competes with your live site later. It is worth double-checking this setting right before launch, since it is one of the most commonly forgotten steps and one of the most damaging when missed.
Use the staging environment to run a full quality assurance pass before anything goes live. Crawl the staging site the same way you would crawl a live site, checking for broken internal links, missing meta tags, and pages that accidentally picked up the wrong template.
Test your redirect map in a sandbox or a small live batch first if your platform allows it, so you can catch mapping errors before they affect the entire site. This is also the right stage to get sign-off from stakeholders on design, content, and functionality, since fixing issues on staging costs far less time and ranking risk than fixing them after launch.
Launch Day Checklist
Launch day needs a tight, methodical process rather than a rushed switch. Work through this list in order.
- Confirm that DNS changes and the SSL certificate are correctly configured
- Push all 301 redirects live and test a sample from each category of your URL map
- Remove the noindex tag and any password protection from the new live site
- Submit the new XML sitemap in Google Search Console and Bing Webmaster Tools
- Verify Google Analytics and Google Tag Manager tracking codes are firing correctly on the new site
- Use the URL Inspection tool in Search Console to request indexing for key pages
- Check that internal search, forms, and checkout or lead capture flows are functioning
- Test the site on mobile devices and across major browsers
Time the launch for a low-traffic window, such as late at night or early morning in your primary market, so any last-minute issues affect the fewest visitors possible. Keep your development and SEO team on standby for the first 24 to 48 hours rather than assuming the job is done once the site is live, and have a rollback plan ready in case something critical breaks, such as keeping the old site accessible on a temporary URL or backup until you have confirmed the new site is fully stable.
Post-Migration Monitoring Checklist
The first 30 to 90 days after launch are critical. This is when small issues either get caught and fixed or compound into significant ranking and traffic losses.
- Monitor Google Search Console daily in the first two weeks for crawl errors, coverage issues, and manual actions
- Track keyword rankings against your pre-migration benchmark to spot drops early
- Check server logs or Search Console crawl stats to confirm Googlebot is actively crawling the new URLs
- Run a fresh site crawl to catch broken links, missing redirects, or duplicate content
- Watch your 404 error report and add redirects for any pages you missed
- Compare organic traffic week over week in Google Analytics against your benchmark data
- Confirm backlinks are landing on the correct new pages rather than hitting dead ends
- Review page speed and Core Web Vitals to make sure the new build did not introduce performance issues
7 Common Mistakes That Tank SEO After Migration
Most migration failures trace back to a small set of repeated errors, and almost all of them are avoidable with a checklist and a second pair of eyes before launch. These mistakes rarely show up as one dramatic failure.
More often, they surface gradually over the following weeks as crawl errors pile up, rankings slide, and traffic quietly drops, which is exactly why they catch teams off guard.
- Forgetting to remove the noindex tag from the live site after launch
- Redirecting all old URLs to the homepage instead of the relevant equivalent pages
- Leaving orphaned pages out of the redirect map entirely
- Changing URL structures unnecessarily when the old structure was already working
- Losing the internal linking structure that previously distributed authority to key pages
- Not updating the XML sitemap, so search engines keep crawling old, non-existent URLs
- Treating migration as a one-day event instead of a process with weeks of monitoring afterward
How Long Does SEO Recovery Take After a Migration
Even a well-executed migration usually causes a short-term dip in rankings while Google re-crawls and re-evaluates the new site. For most businesses, rankings stabilize within four to eight weeks.
Larger sites, or migrations involving a domain change, can take up to three or four months to fully recover and often see the biggest gains only after Google has fully re-indexed and re-evaluated the new site’s authority signals. A dip is normal. A prolonged, worsening decline usually points to a missed step somewhere in the checklist above, most often in the redirect map or the robots.txt file.
Let Manqoosh Handle Your Next Migration
Website migrations touch design, development, and SEO all at once, and even one missed redirect can undo months of ranking progress. If you are planning a redesign, a platform switch, or a full rebuild, our Website Redesign Services (UAE) are built around this exact process, combining SEO-safe redesigns with a structured audit, URL mapping, and post-launch monitoring so your traffic and rankings move with you, not against you.
If your main concern is protecting technical SEO health during the transition, our Technical SEO Service in Dubai, UAE, can audit your redirect map, crawl budget, and indexing setup before you go live. Get in touch with Manqoosh Marketing today and migrate your website with confidence, not guesswork.
Related Posts